The art of leavened breads: how hydration percentage transforms the final result.

Making leavened products is a science intertwined with art, a perfect balance of ingredients, techniques, and patience. Among the determining factors that influence the success of a leavened product, the percentage of hydration plays a crucial role, contributing not only to the doughs consistency, but also to its structure, flavor, and final crispiness. Understanding how dough behavior varies based on the amount of water present is essential for making impeccable bread, focaccia, pizza, and brioche.
What is hydration percentage?
In simple terms, the hydration of a dough is the amount of water in relation to the flour, expressed as a percentage. For example, a dough made with 500 grams of flour and 300 grams of water has a hydration of 60%. This parameter influences the workability of the dough, the type of leavening, and the characteristics of the finished product. The higher the hydration, the softer and more difficult the dough will be to handle, but it will produce leavened products with an airy crumb and a crispy crust. Conversely, doughs with a lower hydration are drier and easier to handle, but produce more compact products with a stiffer crust.
Low-hydration doughs: compactness and structure
Doughs with a hydration level between 50% and 60% are typical for products like common bread or shortcrust pastry. This amount of water creates a dry, solid consistency, ideal for well-defined shapes. These doughs are easier to work with, as the mass is less sticky and easily moldable. The end result is a leavened product with a compact crumb, small, regular air pockets, and a sturdy crust. For example, a rustic bread or a rye bread tends to retain these characteristics, offering a denser chewiness and intense flavor.
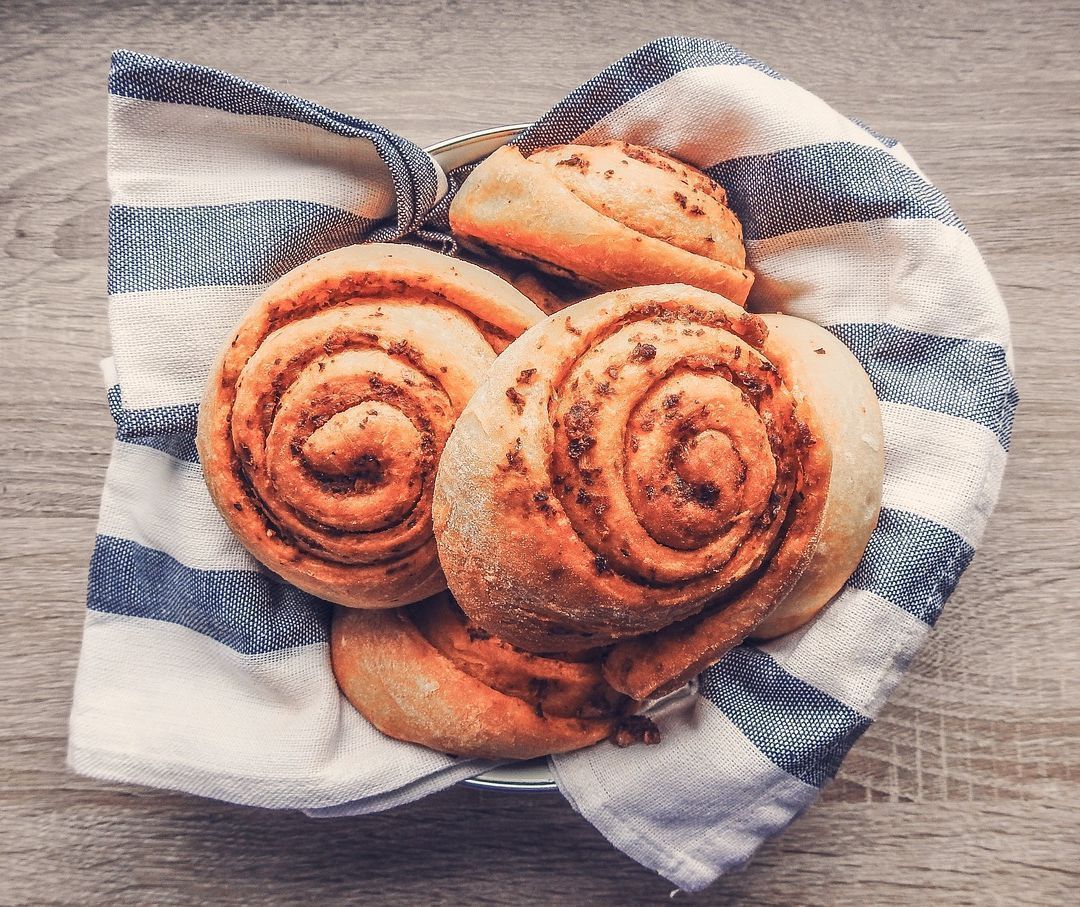
Cinnamon rolls
Tradotto dall'inglese-Un rotolo alla cannella è un panino dolce comunemente servito nel Nord Europa e nel Nord America.
Tempo di preparazione
30 minutiTempo di cottura
30 minutiLievitazione
6 orePorzioni
DifficileDose
8Strumenti
Forno, PentolaIngredienti
Farina Manitoba600 gZucchero di canna180 gAcqua130 mlLatte parzialmente scremato130 mlBurro100 gSale fine8 gLievito di birra (fresco)8 gUova1 pz (60 g)Cannella in polvereq.b.1 Prima di tutto preparate un lievitino mescolando insieme lievito, 100 gr di farina (presa dal totale) 100 gr di acqua e latte miscelati presi dal totale. Impastate insieme lasciate lievitare 2 h fino al raddoppio.
2 Poi preparate l’impasto unendo al lievitino il resto della farina, lo zucchero, il resto di acqua e latte. Potete procedere impastando a mano, oppure con impastatrice o planetaria. unite l’uovo, impastate al fine di ottenere un impasto omogeneo, infine aggiungete il burro a piccoli pezzetti e il sale. L’impasto è semplice da lavorare, dovete ottenere una palla liscia che si stacca dalle mani. Se l’impasto risulta troppo morbido spolverate di farina. Fate lievitare per 3 – 4 h il tempo che triplichi di volume.
3 Stendente l’impasto con un matterello ad uno spessore di 1 cm, formando un rettangolo. Spennellate con burro fuso e aggiungete cannella e zucchero precedentemente mescolati insieme su tutta la superficie imburrata. Arrotolate stretto l’impasto dalla parte laterale più lunga.
4 Infine affettate delicatamente ogni girella con un coltello affilato o con uno spago da cucina. Una volta realizzate tutte le rotelle, posizionate in una teglia foderata di carta da forno. Posizionate ogni roll ad una distanza di 1 cm da tutti i lati. Lasciate lievitate in teglia per circa 1 h circa fino al raddoppio. Finché non si uniscono.
5 Cuocete in forno statico ben caldo a 180° per circa 25 minuti.
Medium-hydration doughs: the right balance
A dough with a hydration level between 65% and 70% represents the perfect balance between workability and lightness. This range is typical of products such as Neapolitan pizza, ciabatta bread, and some focaccias. Moderate hydration allows for good gluten formation, which traps the gas produced by leavening, creating an airy but not overly airy crumb. The crust tends to be thinner and crispier, with a slight springiness. This category includes many leavened products that require a long leavening time to develop flavor and structure.
Focaccia casareccia
Soffice e dorata, la focaccia casareccia conquista con la sua crosticina croccante e il cuore morbido, perfetta da condividere in ogni momento!
Tempo di preparazione
20 minutiTempo di cottura
20 minutiLievitazione
6 ore e 30 minutiPorzioni
FacileDose
12Strumenti
FornoIngredienti
Farina Manitoba2500 gAcqua1750 mlOlio EVO180 mlSale fine50 gLievito di birra (fresco)25 g1 Sciogliere il lievito all'interno dell'acqua tiepida.
2 Aggiungere la farina e mescolare energicamente fino a quando non sarà completamente assorbita. Ci vorranno circa 10 minuti con un'impastatrice e 15 se impastate a mano.
3 Aggiungere il sale e l'olio e mescolare nuovamente fino ad integrare tutti gli ingredienti.
4 Stendere l'impasto su un piano rigido ed effettuare un giro di pieghe.
5 Una volta effettuata la piega attendere 15/20 minuti prima di effettuarne un'altra. Si dovranno fare in totale tre pieghe.
6 Lasciare lievitare l'impasto per 6 ore. L'impasto dovrebbe essere ora quasi triplicato. Stagliare l'impasto in diversi panetti e lasciar lievitare separatamente per altre 1-2 ore.
7 Accendete il forno a 220°C. Nel frattempo ungetevi le mani e stendete l'impasto su una teglia in alluminio. Applicate quindi le dita in modo da formare i caratteristici buchi della focaccia.
8 Infornare per 20 minuti fino a quando non risulterà dorata in superficie. Servire calda.
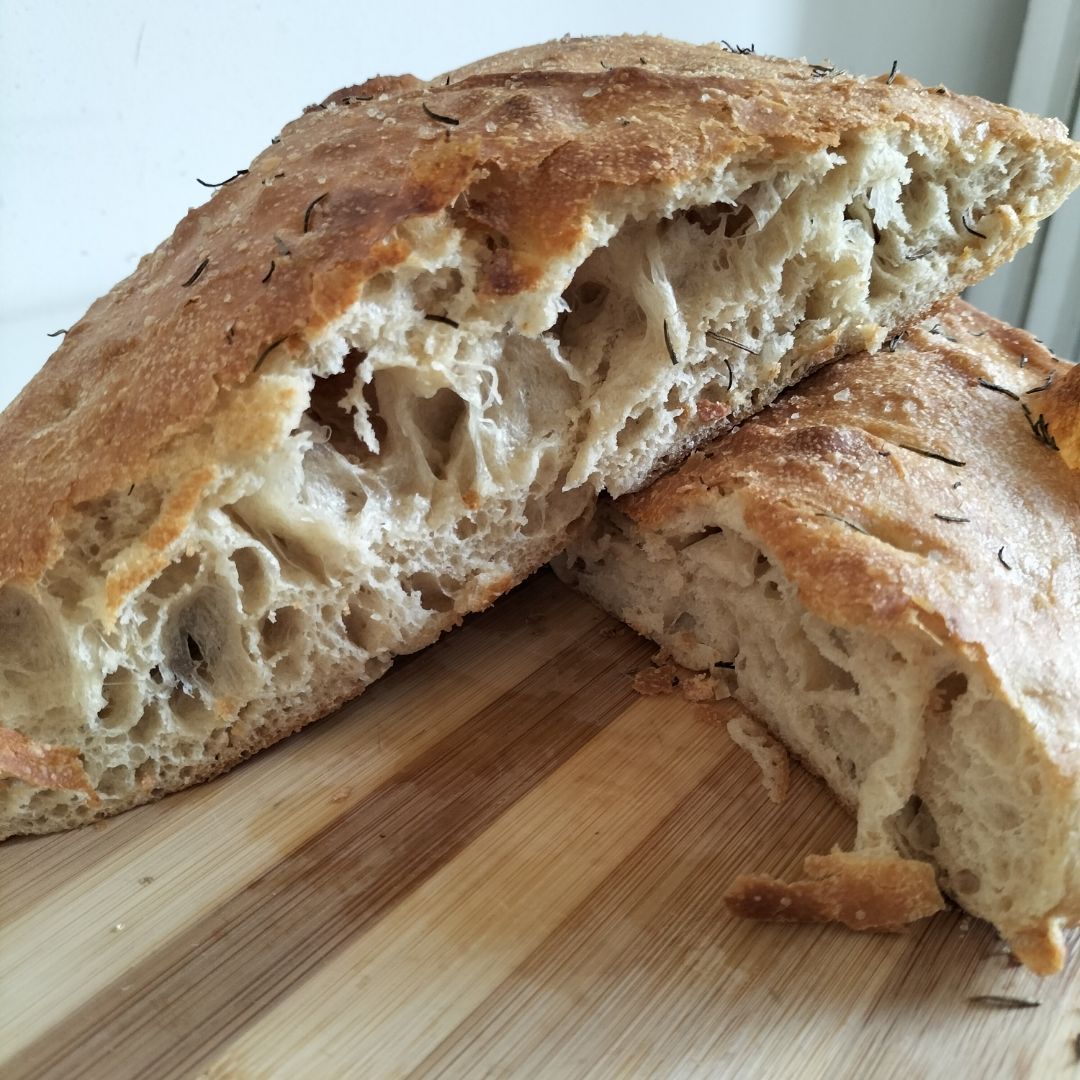
Highly hydrated doughs: extremely light
When the hydration level exceeds 75%, the dough becomes extremely soft and difficult to work by hand. This is where specific techniques come into play, such as folding and delicate handling, often with the help of spatulas and well-floured surfaces. These doughs are typical of modern breads that require long leavening, such as ciabatta with large cavities, rustic bread, or high-hydration focaccia. The high water content promotes a more vigorous leavening process, allowing the cavities to develop irregularly and widely. The result is a very light and airy crumb, while the crust becomes extremely crispy and crumbly, thanks to the steam generated during baking.
Hydration and flours: a crucial relationship
Not all flours respond to hydration in the same way. Flours with a high protein content, such as Manitoba flour, can absorb more water, forming a resistant gluten network even at hydration levels above 70%. Conversely, weak or whole-wheat flours, while retaining more water due to the bran, produce less elastic and more fragile doughs. To achieve optimal results, its important to match the right hydration to the type of flour and the processing technique. For example, Neapolitan pizza dough requires a strong flour with a hydration level of around 65%, while a rustic focaccia can reach 75% using type 1 flour.
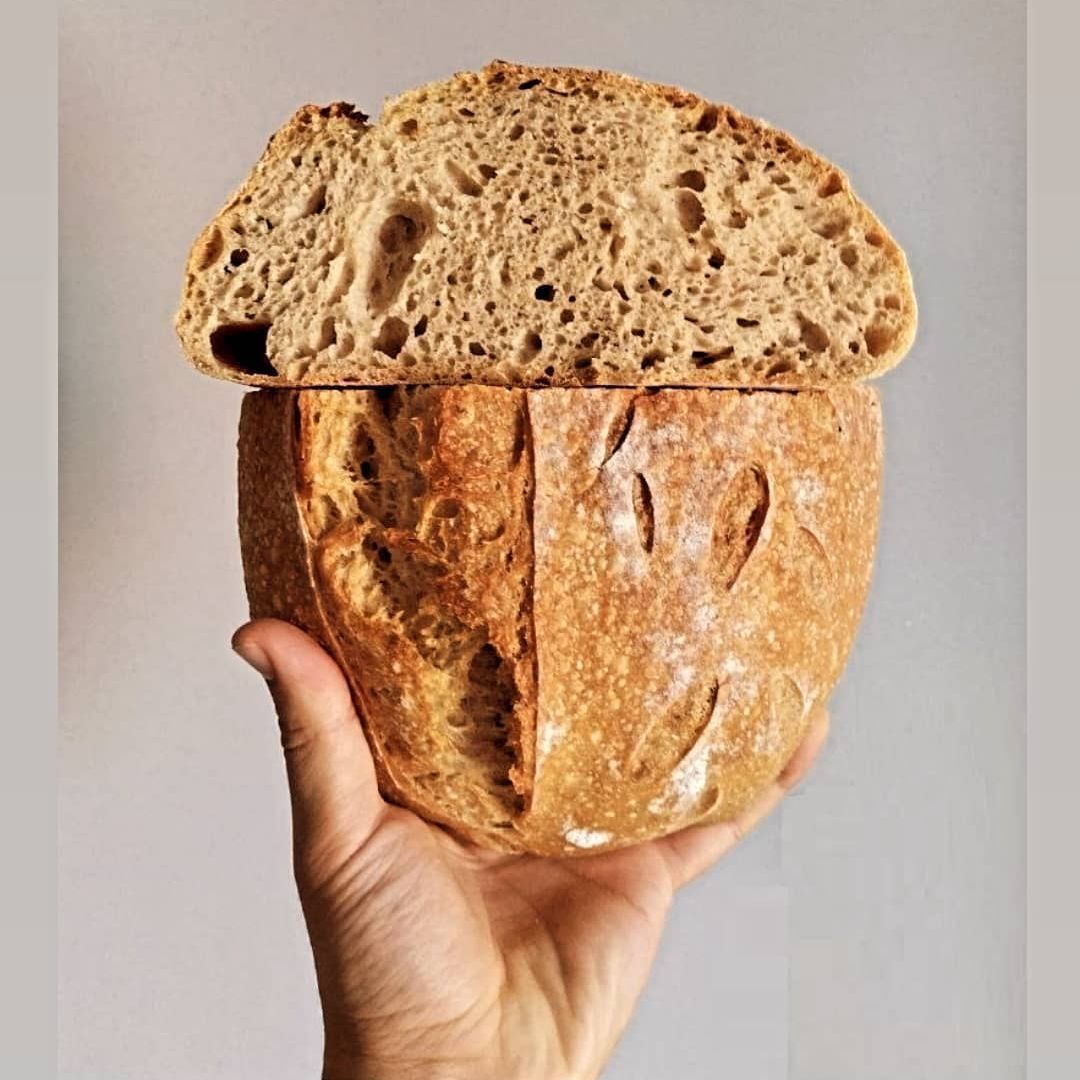
Pane ad alta idratazione
Pane ad alta idratazione, con crosta croccante e mollica soffice e alveolata. La ricetta ideale per un pane artigianale dal gusto autentico!
Tempo di preparazione
30 minutiTempo di cottura
50 minutiLievitazione
6 orePorzioni
DifficileDose
4Strumenti
Forno, TegliaIngredienti
Farina Manitoba500 gAcqua375 ml1 Questa non è la rigorosa preparazione del pane ma può comunque garantire una pane morbido e croccante. Iniziate mescolando l'acqua e il lievito in una ciotola abbastanza capiente. Aggiungete dunque un cucchiaio di malto d'orzo o in alternativa di zucchero e la farina. Mescolate energicamente per 5 minuti.
2 Lasciate quindi riposare per 10 minuti in modo che si formi la maglia glutinica che andrà ad incorporare ed ingabbiare l'anidride carbonica rilasciata dai lieviti.
3 Stendete quindi l'impasto in un piano liscio e iniziate ad applicare un giro di pieghe. Lasciate riposare 10 minuti. Dovranno essere effettuati 3 giri di pieghe.
4 Prendere dunque un cestino per il pane (anche una forma per i plumcake in alternativa andrà bene) e riponete il pane a lievitare per 6 ore a temperatura ambiente. In questo modo avverrà la sua formatura.
5 Terminata la lievitazione, accendete il forno statico a 220°C mettendo sul fondo una teglietta con dell'acqua. In questo modo l'ambiente del forno si manterrà umido e verrà favorita l'apertura del pane. Capovolgete il pane in una teglia e applicate un taglio netto verticale.
6 Infornate per 20 minuti. Trascorso questo tempo rimuovete dal forno la teglia con l'acqua ed abbassate la temperatura a 180 °C. Continuate la cottura per 30 minuti. Sfornate e fate raffreddare il pane capovolto.
The magic of steam and humidity in cooking
Another often overlooked aspect is the role of water during baking. In highly hydrated doughs, the steam produced by residual moisture improves the crusts crispiness and contributes to that subtle caramelization that makes leavened products irresistible. For this reason, many bakers add steam to the oven during baking, especially in the first few minutes.
🍞 The Complete Kit for Perfect Leavening at Home
Want to bring the smell of freshly baked bread right into your kitchen? This bread proofing kit is the ideal companion for any aspiring baker. It contains everything you need: a natural rattan basket for even leavening, blades for precise scoring, a wooden brush, and scrapers for optimal dough management. An elegant, practical set, its also a perfect gift for those who love kneading dough. Discover it now on Amazon and start making your own artisanal bread! 🍞✨
www.amazon.itConclusion
Hydration percentage is one of the most powerful tools in the hands of those who venture into the art of leavened products. Experimenting with different hydrations allows you to discover how each variation profoundly influences the final product, from texture to crispiness to flavor. Knowing and mastering these details not only enriches our culinary experience, but also transforms every leavened product into a small masterpiece of balanced science and creativity.

flavio_campaniolo
Data di inserimento 24 apr 2025
Report article

Comments
There are no comments yet.